 dLight for LEGO MINDSTORMS

Give your NXT a bright future with the dLight. The dLight is a bright LED that can be controlled by your NXT. A dLight is capable of producing millions of different colors that can be continuously on or blink in various patterns. Up to four dLights can be daisy chained on a single sensor port and still be controlled individually.
Hardware

The dLight Adapter has an LED and a NXT Female Port
A set of dLights consists of one adapter board, three satellite boards and three cables for connecting the boards.
Both the adapter and the satellite boards have a small but bright LED on one side and the electronics and connectors on the other side. The boards have holes to connect them to your LEGO device.
The adapter board has a standard LEGO connector and a two smaller custom connectors, one to the left and one to the right. The adapter board can be connected to a NXT using the NXT connector and a standard NXT cable. The two custom connectors are used to connect satellite boards using the cables that come with the set.

dLight Satellite LED
The satellite boards have no NXT connector and are smaller than the adapter board. They do have two custom connectors that are used to connect them to each other or to an adapter board. Satellite lights have two very small switches on the back side that are used to select an address and give the Satellite a unique address for commands.
The set comes with three custom cables to connect the satellite boards to each other or to an adapter board. The cables are color coded to help you make a proper connection.
Connecting dLights
To connect all four dLights one needs just one free sensor port on the NXT. The adapter board is connected to the sensor port. The satellite boards are connected to the adapter board or to another satellite board. When connecting the satellite boards one must make sure to properly connect the four pins, an upper pin must always be connected to another upper pin. Use the different colors of the cable to check this.

The dLight Cable – Your Kit should come with 3 of these.
It does not matter if you use the right or left connector, one can freely choose either one. A satellite board can be connected to another satellite board, and so on, as long as one of the satellite boards is connected to the adapter board.

A dLight Adapter with Colored Cables Cables connecting the lights.
Here is a closeup picture of the dLights properly connected. Notice that the red wire goes into the dLight facing the three holes on both the Adapter and the Satellite. Click on the image for a closer look.

The dLight Properly Daisy Chained.
Mounting dLights
There are many ways to mount the dLight to your robot! Below are a few different ways that the dLight can be mounted to Technic beams. We recommend a few ways to mount the dlight. The first is to use the crosses provided with the LEGO MINDSTORMS kit.


The holes on the dLight are spaced such that the LED on the Satellit and the dLight Adapter will mount in the middle of a Technic beam. You can see this in the picture below.

dLights have mounting holes to connect them to your Lego device using technic pins 1/2 (item 4274) or technic axle pins (item 43093). There are a total of four holes giving you different possibilities to mount your dLight. The picture below should give you an idea of the different possibilities for mounting the dLights to your robot.


Addressing the dLight
Although all four dLights of a set are connected to a single sensor port, they can still be controlled individually by giving them a unique address. The address of the adapter board is always 1. The address of a satellite board can be selected using the two micro switches on the board. The picture below shows the switch positions and corresponding addresses. The address of a dLight is later used in your program to control each of the dLights individually. If two or more dLights share the same address they are controlled as a group.

Saving energy
dLights use energy. With some extra care you can increase your battery life by decreasing the amount of energy used by the dLights. Most often you do not to use the full brightness of the dLight. Try to make them just as bright as you need. Switch the lights off at the end of your program.
Software
NXT-G

NXT-G Blocks and examples are provided for the dLight. You can download both here.
The NXT-G functions are:
- Light # – The light number you want to control with the control panel. This allows you to send a specific command to a specific light on the chain of LED’s. “0” sends the message to all LED’s and adapters. “1” sends the message to LED #1. (0 – 4)
- Initialize – In your program, you must first initialize the LED’s. You only need to call the initialize function once. (On/Off)
- RGB – Within the control NXT-G Block, you can set the intensity of the Red, Green, and Blue light in the LED. (0-100)
- LED On – Turns the LED on. (On/Off)
- Blink – Turns blinking on and off for the LED (On/Off)
- Blink Freq – Controls the blinking frequency of the LED (0-100)

The NXT-G Block has automatic plugs for:
- Blink Frequency
- Red
- Green
- Blue
- Initialize
- LED On
- Blink
Example Programs:
All of the following programs are available for download in the NXT-G section of the dLight. We have screenshots of example programs below to help users troubleshoot their programs and understand the capabilities of the dLight.

This NXT-G Program increases the blinking rate of all of the LEDs.
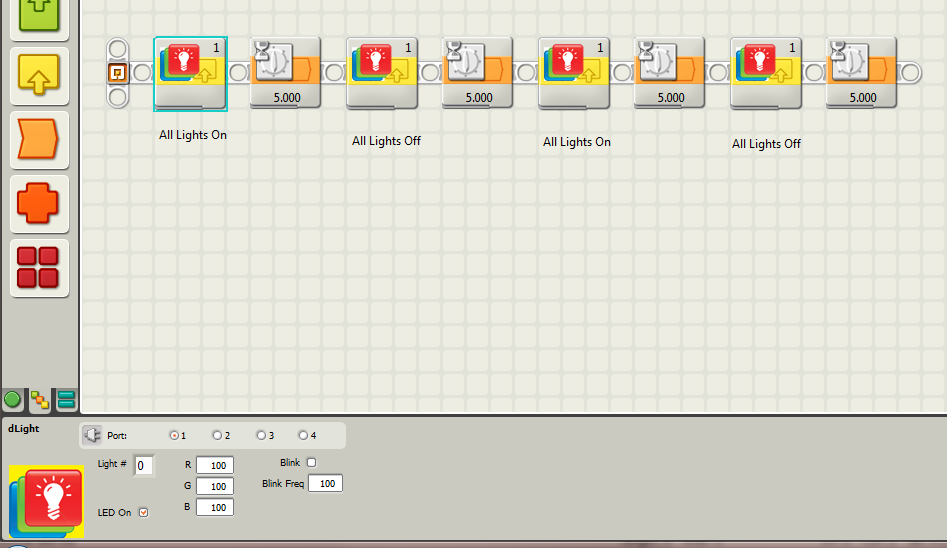
This NXT-G program turns the dLights on and then off.