Program the Raspberry Pi Servo Controller in Scratch

Program the Raspberry Pi Servo Controller in Scratch

Scratch Programming for the PivotPi

Scratch Programming for the PivotPi

Dexter Industries’ Raspbian for Robots operating system allows you to program the PivotPi , a Raspberry Pi-based servo controller, in Scratch without any special setup. This page will walk you through how to program the Raspberry Pi Servo Controller in Scratch.  You will be up and running in no time!

One PivotPi and up to 8 servos are supported!

First Scratch Program for PivotPi

Things to Know Before Starting

The PivotPi supports up to four different I2C addresses but only the default addressing is supported within Scratch. You have to double-check that your PivotPi does indeed use the default address ( the address switches are most likely in that position when you take the PivotPi out of the box). Both address switches should be set to the low position as shown here:

PivotPi Default Address Switches Position

PivotPi Default Address Switches Position


PivotPi with other Dexter Industries Robots

When double clicking on the Scratch icon on the desktop you are presented with a “Scratch for Robots” dialog where you can select your robot.

If you use the PivotPi on its own then you need to select the PivotPi entry.

However if you use it in conjunction with another robot, you need to select that other robot. For example, if you wanted to control the PivotPi and the GrovePi you would select “GrovePi”.  For a GoPiGo+PivotPi combination, please select the GoPiGo option.

The PivotPi commands can be accessed through all our robots.


Broadcast Commands - Basic Knowledge

There are basically two Scratch commands that you can send to a PivotPi board :

  1. One command controls the servo – called a pivot
  2. One command controls the associated LED

All PivotPi commands start with the word Pivot. Any other command – not starting with Pivot –  will be sent to either GrovePi or GoPiGo, or simply ignored.

Spaces:

PivotPi commands are quite forgiving about the use or non-use of spaces – and that gives you a bit more flexibility. You may enter everything in one line or make use of the JOIN block. Details are given below.

Upper/lower cases:
PivotPi does not care about the use of upper or lower cases. You choose what you like.

Keep this image as reference when you start coding. It’s an overview of all the PivotPi commands which we will detail below.

Summary of all PivotPi Scratc Commands

Summary of all PivotPi Scratch Commands

Broadcast Commands - Pivot


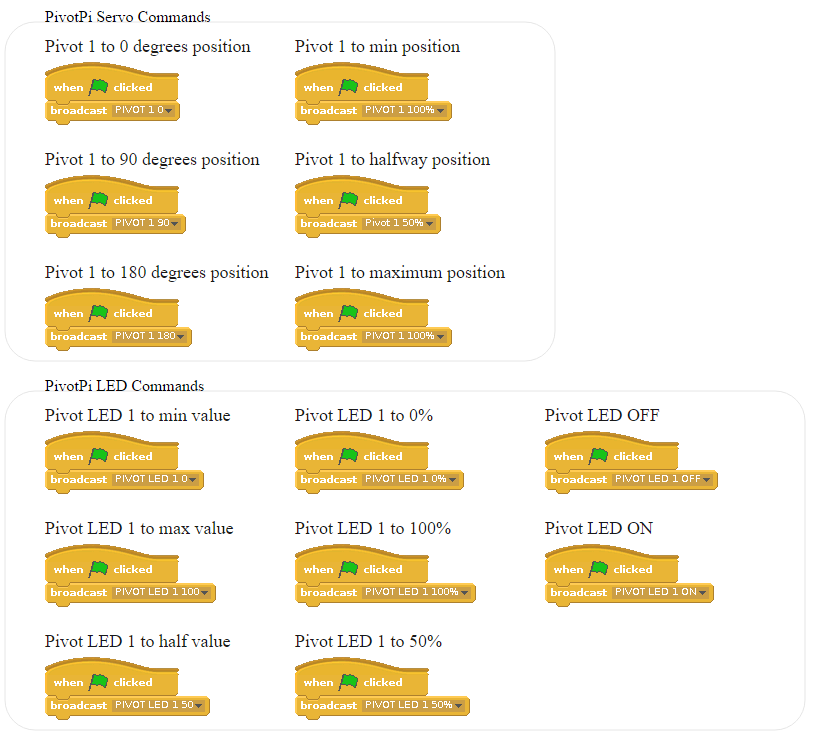
In Scratch we refer to each servo as a pivot. To program the Raspberry Pi Servo Controller in Scratch, we direct what the Pivots are doing.  The two words refer to the same thing but the code will only understand the pivot command.

Here are some block examples:

  image10 Sets the pivot on port 1 to the 0 degrees position.
 PivotPi Pivot 1 90 Sets the pivot on port 1 to 90 degrees
 image19 Sets the pivot on port 1 to 180 degrees.


You can also set the position of the pivot as a percentage value.

image11 Set pivot to 0% (which means 0 degrees)
 image06 Set pivot 1 to 100% (or 180 degrees)


If you want to have the position in a variable then you would have to use a JOIN block as illustrated here:

PivotPi Scratch Set position to 0 degrees 

Repeat 4 times

Set the pivot to the specified position and wait a second.

Increment position by 45 degrees

Wait 1 second

When using the percentage approach, we need to put the ‘%’ sign at the end so  it would look like this:

PivotPi Scratch variable percent position

If you wanted to have the pivot selection in a variable, you would need two JOIN block as follow:

PivotPi Scratch Pivot Variable Set player to 2 (assuming a multiplayer game) 

Move the second servo to 90 degrees

Broadcast commands - LED

Controlling a PivotPi LED

The LEDs on the board are meant to give you some sort of feedback on the status of the pivots but you have to control them directly – or you may wish to ignore them or use them for another purpose completely.

As stated before, every command sent to the PivotPi board starts with Pivot and it’s the same here. The simplest commands to control an LED are:

image09 Turns the first LED on
 PivotPi Scratch LED OFF Turns the first LED off

However you can also set the intensity of the LED. Intensity goes from 0 to 100, with or without the ‘%’ sign at the end.

PivotPi Scratch LED 0  PivotPi Scratch LED 0% Set LED 1 to 0  

This is the same as setting it to OFF

 PivotPi Scratch LED 50  PivotPi Scratch LED 50% Set LED 1 to 50 (or 50%)
 PivotPi Scratch LED 100  PivotPi Scratch LED 100% Set LED 1 to 100 (or 100%) 

This is the same as setting it to ON.


Projects

Projects that have been built with PivotPi and coded with Scratch:

Build a Snowman with PivotPi
Do You Want to Build a Snowman?

Do You Want to Build a Snowman?