Full Control!
Python allows full control over the PivotPi. It is very straightforward to use while allowing advanced users the control they need for precise movement.
Up to four PivotPi can be controlled – that’s 32 independent servos! What will you dream of?
Before you can program you need to make sure you have the code. Please refer to these instructions if you are not sure.
To program in Python you will need:
- to import the PivotPi library
- to create a PivotPi object
- to use the PivotPi object to control a servo
- to use the PivotPi ojbect to control an on-board LED
The following video will show you how to write a basic Python program using the PivotPi.
If you’re experienced with Python and just need a short example, we have it! If you need to dig further into the documentation, please be sure to look into the following sections
from pivotpi import *

from time import sleep

# create a default Pivot

my_pivot = PivotPi()

# go to 0, and turn LED off

my_pivot.angle(SERVO_1,0)

my_pivot.led(SERVO_1,0)

sleep(1)

# go midway

my_pivot.angle(SERVO_1,90)

my_pivot.led(SERVO_1,50)

sleep(1)

# go max

my_pivot.angle(SERVO_1,180)

my_pivot.led(SERVO_1,100)

sleep(1)
To access the PivotPi functionality from within Python, you need to import the library
import pivotpi
or
from pivotpi import *
which we recommend.
On Raspbian for Robots, this library is already installed system-wide and you have nothing special to do.
If you are using PivotPi with your own version of the OS, you have three choices:
- Run the install.sh script found in PivotPi/Install folder as such:
sudo bash install.sh
or, - Go to the Software/Python folder and run one or both of the following lines:
sudo python setup.py install

sudo python3 setup.py install
or, - Place a copy of the pivopi.py library, found in Software/Python, into your own work library.
To create an instance of a PivotPi class, run the following:
import pivotpi

my_pivot = pivotpi.PivotPi()    # this uses the default values
or
from pivotpi import *

my_pivot = PivotPi()    # this uses the default values
PivotPi( actual_address, actual_frequency )
In certain cases you may need to pass on more information. Two arguments are available if needed: board address and board frequence.
Board address:
The first argument is the address of the PivotPi when it’s different than the default one (0x40 or both switches set to low). The address must match the address switches.
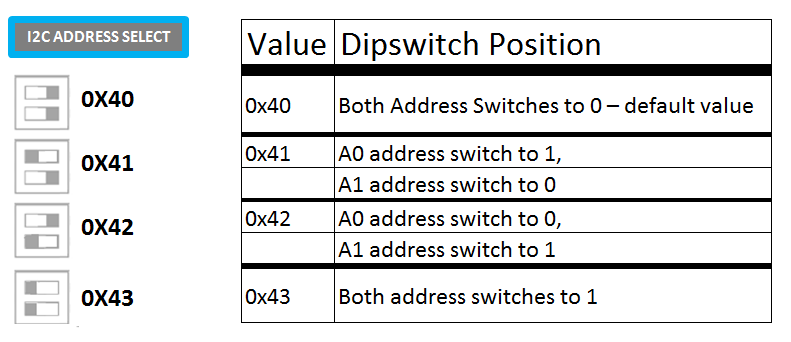
The following calls are therefore valid:
Pivot1 = PivotPi(0x40)  # Set Up the PivotPi on the default address.

Pivot2 = PivotPi(0x41)  # Set Up the PivotPi on address 0x41

Pivot3 = PivotPi(0x42)  # Set Up the PivotPi on address 0x42

Pivot4 = PivotPi(0x43)  # Set Up the PivotPi on address 0x43
Frequency argument
The second argument is for advanced users and is used to correct the frequency of the internal clock. By default it is at 60 Hz but may vary by up to 5% due to differences in the on-board chip. You can adjust the frequency like this:
# Set Up the PivotPi on the default address, with a 63.54 Hz pulse.

MyPivot = PivotPi(0x40, 63.54)
In most cases you will not have to deal with this second argument but if you have a logic analyzer, you can determine the frequency of your particular board and add it to the setup call as above. By measuring and specifying this frequency, you can switch between different PivotPi boards, and get nearly identical results. Note that for precise calculations, you should use the angle_microseconds() method described below, in the Controlling a Servo section
You can control a servo in one of two ways:
myPivot.angle( servoID, degrees )
servoID is a number between 0 and 7 and identifies the specific servo
degrees is the position the servo should go to
myPivot.angle_microseconds( servoID, duration )
servoID is a number between 0 and 7 corresponding to the servo number on the PivotPi board
duration is how long in microseconds should power be given to the servo.
This last function angle_microseconds allows for precise control of the servo, especially in the case where the frequency of the board has been set to something else than its default value of 60 Hz.
Some predefined constants are available for use as the SERVO_ID so the number will match what’s on the board:
SERVO_1 = 0
SERVO_2 = 1
SERVO_3 = 2
SERVO_4 = 3
SERVO_5 = 4
SERVO_6 = 5
SERVO_7 = 6
SERVO_8 = 7
Example:
# brings the servo connected to the first port to a position of 90 degrees

myPivot.angle(SERVO_1, 90)

# get the second servo to move during 150000 microseconds or 0.15 second

myPivot.angle_microseconds(SERVO_2, 150000)
The PivotPi board has 8 LEDs onboard that you can use for feedback on the servo status. Do note that the LEDs are not linked to the servos and will not provide any feedback unless you do so in your code. Or you may want to use the LEDs for something else entirely like the number of lives in a game or create a light effect for specific events. It’s up to you completely.
my_pivot.led ( SERVO_ID, intensity )
SERVO_ID is a number between 0 and 7 associated with the specific led.
intensity is a percent value that determines how bright the led will be
Example:
# set the third LED to half brightness

my_pivot.led(SERVO_3,50)