 Congrats on your new Raspberry Pi. You are holding a great little device with a unlimited potential in it. You can create your own version of Dropbox, or a crazy little LEGO tank of maybe a server to host your own website with this little credit card sized computer.
Like most of the users, you probably don’t have a spare monitor, keyboard or mouse lying around or maybe, just the thought of working on a Pi with it’s separate keyboard, mouse and a monitor big enough of a pain that your Pi has been gathering dust for a long time now.
So here’s a guide which will help you to set up Raspberry Pi so that you can directly access the terminal or the Desktop via VNC over the network (WiFi or Ethernet) without the need for a monitor, keyboard or a mouse. This mode is called Headless mode for connecting to the Raspberry Pi.
This one is going to be a bit long, but you can reap endless rewards once you are done with it.
The Dexter Industries SD card comes configured with Bonjour, software which allows you to get the networking up and running with zero configuration.
- If you are using Windows and don’t have iTunes installed, download Bonjour from here and install it, then move down to the Windows section below.
- If you are on a Mac or already have iTunes installed then you have everything you need, and just move on down to the Mac section below.
- If you are using your own image, just install avahi-daemon in your Raspbain image:
sudo apt-get update
sudo apt-get install libnss-mdns
Connect Over Ethernet
Windows
- Make sure the Raspberry Pi board is switched off, motors are not connected and the batteries are not connected.
- Make sure your sd card is in the Raspberry Pi securely.
- Plug in your wifi dongle to a USB port on the Raspberry Pi.
- Connect your ethernet cable to your computer and to the Raspberry Pi.
- Plug in the wall power adapter into the Raspberry Pi, and then plug it into the wall to turn the power on. Once the power is connected to the wall, the Raspberry Pi will be on.
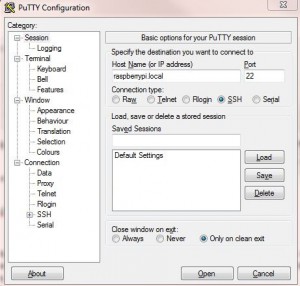
- On your computer, open Putty and enter the Host Name as raspberrypi.local and press open.
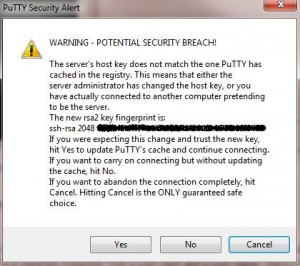
If everything goes according to plan, you’ll be prompted with a security prompt. Press “Yes”
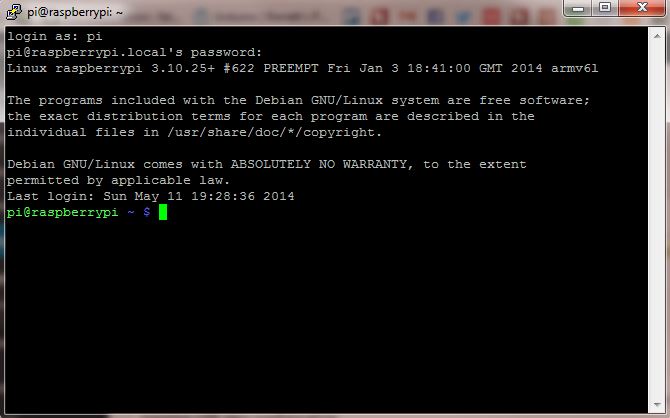
This will open a terminal and ask for a Username and Password. The username is “pi” and the password is “raspberry“. After entering the credentials, you’ll get logged on to the Raspberry Pi terminal.
Next, go down to Step 2, where you will set up your Wifi.
Mac
- Make sure the Raspberry Pi board is switched off.
- Make sure your sd card is in the Raspberry Pi securely.
- Plug in your wifi dongle to a USB port on the Raspberry Pi.
- Connect your ethernet cable to your computer and to the Raspberry Pi. (If you have a Macbook air you may need an ethernet to USB adapter)
- Plug in the wall power adapter into the Raspberry Pi, and then plug it into the wall to turn the power on.
- Open “Terminal” on your computer. This can be found in Applications/Utilities folder. You can also just search through it with “spotlight” (click on the magnifying glass on the top right hand side of your screen or press “command + spacebar which will open up the search bar and you can type in “Terminal”) to find it. Click on the terminal icon.
- Type in:
ssh pi@raspberrypi.local
You’ll be prompted to verify you’re trying to login to the Raspberry Pi.
7. Type “yes” and press return. Type the password, which is “raspberry” and press return.
Boom! You’re logged into your Raspberry Pi and ready to start programming your robot!
8. The next step will be to get setup with VNC, which is a way to see a mini desktop version of what is going on in your robot.

Connect Over Wifi
To make your Raspberry Pi robot work remotely, without keeping it plugged into the computer and wall at all times, we’ll want to set up the Wifi!
1. Your wifi dongle should already be in the Raspberry Pi and you are connected to it through terminal.
Make sure you know which wifi network your computer is using, as well as the password for that wifi network.
2. Go to: https://www.realvnc.com/download/vnc/
3. Click Download for whichever version matches your computer.
4. If you don’t know what version of OS X you are running, click the apple icon in the far left top part of your screen and choose “About This Mac” and it will display the version of OS X you are running.
5. Open the VNC file in your browser, of if it is not there, go to Finder->Downloads, and you will find it there.
6. Select Continue.
7. Select Continue.
8. Select Agree on this pop up.
9. Select Continue.
10. Deselect VNC Server, because you only want VNC Viewer. Select Continue.
11. Select Install and then you will get confirmation that the installation was successful. Select Close.
12. Go to Finder-> Applications-> Real VNC -> VNC Viewer to open VNC Viewer.
13. In the VNC Server box type: raspberrypi.local:1
This is telling the VNC Viewer the following:
- look for the “raspberrypi”
- location is “local” (connected to your computer)
- port = 1 (port is …)
You will probably get a pop up that looks scary and is a warning. Don’t worry!
It just means that the connection between your Raspberry Pi and your computer is not encrypted, which is a secure way of transferring data. This isn’t a big concern if you are doing this at home or in a trusted place, because no one else can get access to your computer.
14. Select Continue (and choose the check box if you don’t want to be warned about this again).
15. You will be prompted to put in a password to access the Raspberry Pi “hard drive” (SD card) connected to your computer. The password for all Dexter Industry SD cards is: raspberry
16. Type: raspberry
17. Select OK.
You’ve done it! This screen is the VNC desktop. Remember, the VNC (virtual network computer) is basically a little virtual computer you are running inside your computer. This is the “Desktop” for the Raspberry Pi computer connected to your computer!
It works pretty much the same way that your normal desktop does. The files and shortcuts you see will open files and run programs on the SD card in your Raspberry Pi.
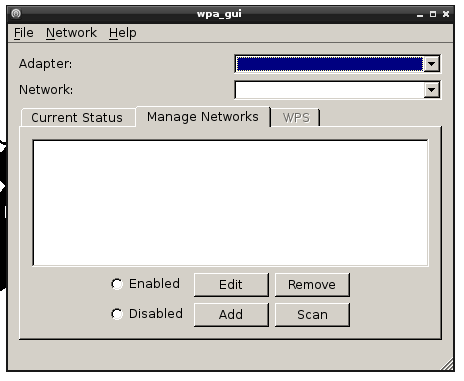
18. Click on the icon in the middle of the desktop that says “WiFi Config”
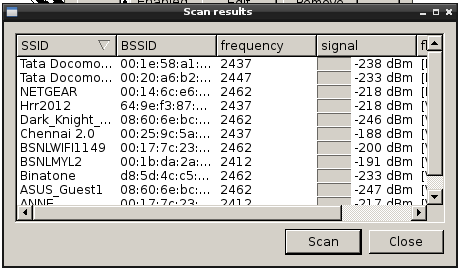
19. Select the second tab: Manage Networks. Select the Scan button. The program will scan for wifi networks nearby.
This may take a moment, and in the meantime your screen will just be still.
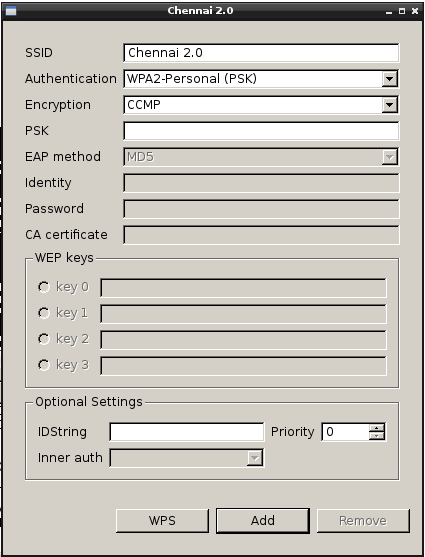
20. Select the same network your computer is on by double clicking and you will get a pop up where you will enter your PSK (which is the password for your wireless network).
21. It will take you back to the Scan screen, and just select Close.
22. Click on the first tab Current Status, then choose your network from the dropdown Network list, then select Connect.
23. This might take a few minutes. Do not panic if it tries to connect and comes back without an IP address. Just select Connect again and after 3-5 minutes you should have an IP address showing.
24. If you do not get an IP Address to show, check the following:
- Go back to Manage networks, select your wifi network by double clicking and re-enter the PSK (password). Maybe you entered in the password incorrectly before.
Good test to see if you are connected:
- Open LXTerminal icon on the VNC desktop (the Dexter Industries desktop).
- Type: ping google.com
- If you get a response like the picture below, then YOU ARE CONNECTED!!! Press “Control + c” to get this to stop.
- Check the wifi Dongle and make sure it is securely attached, and there should be a blinking light inside the wifi dongle.
Have questions? Ask on our forum!
Learn More!
If you liked this tutorial, consider getting the SD Card with Raspbian for Robots , Raspberry Pi, Ethernet cable and Wifi Dongle for the Raspberry Pi to try out this tutorial.