Scratch Programming Language With the Raspberry Pi and the GoPiGo3
We’ve optimized Scratch and the GoPiGo3 for our operating systems, Raspbian for Robots. This is a free operating system you run on your Raspberry Pi. You can download and install Raspbian for Robots for free here. You can also download the latest version and install them with these directions. The below instructions assume you are using Raspbian for Robots.
Connect To Your GoPiGo
The first step to programming in Scratch with the GoPiGo and Raspberry Pi is to connect over wifi or ethernet. You may find our tutorial on setting up the GoPiGo and connecting over wifi helpful. You can watch the Youtube playlist below.
Start Scratch Programming Language
To start on the Scratch programming language, just double click the Scratch Icon on the Desktop

After clicking the Scratch icon on the Desktop, the Scratch for Robots window will open. The Scratch Controller terminal program (the black window with white text) will open as well, do not close it! In the Scratch Controller window you can select your robot (the GoPiGo should appear in the picture as shown below).
You can start programming directly by clicking on “Start Programming.” You can also select an example program by clicking “Open Examples”. This will open the example program directory.

If you double click a Scratch program in the directory, or double click any Scratch program you have saved, a Scratch dialog box will pop up.

The Scratch for Robots robot selector will appear. Select the GoPiGo in the dropdown menu, and press “Start Programming”.

You will get a warning that all the Scratch programs running will be closed. You can only run one Scratch program at a time.

After clicking “OK” the example program will appear. You will see an alert that communications have started. Click “Ok” and begin!
Beginning programming, in the below example you’ll see the example car.

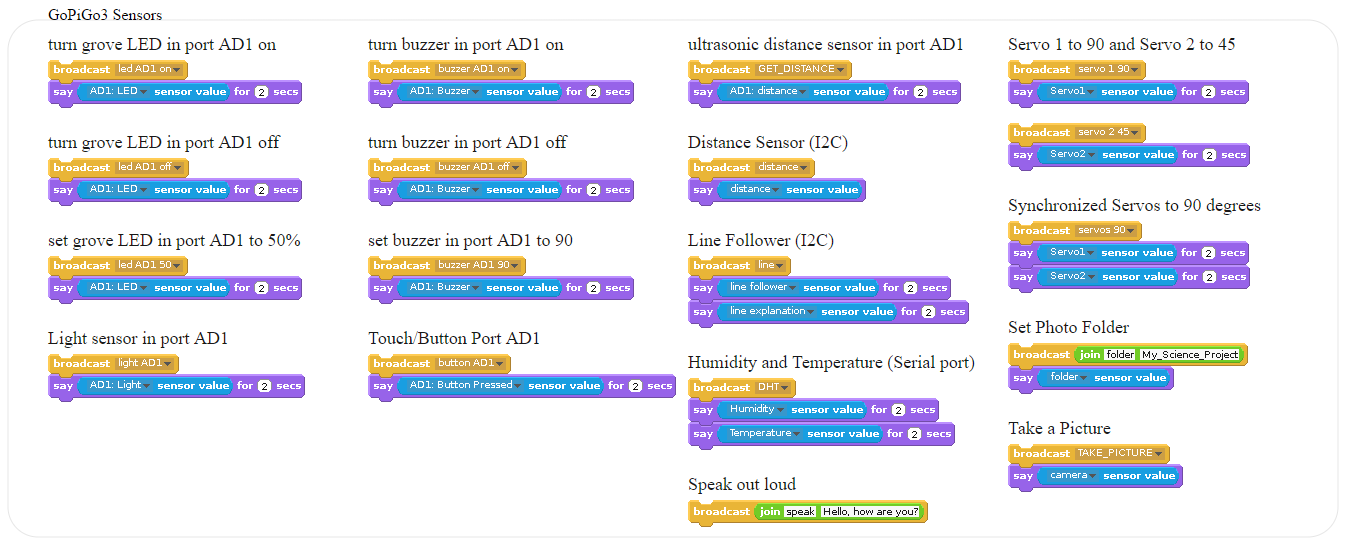
Sensors and Ports
Have a question? Ask us on the forums!
Block Reference: Scratch Broadcast Messages
Here is a quick reference on the blocks available in Scratch for the GoPiGo and how to create custom blocks for GoPiGo with Scratch.
Long and short format:
Many blocks come in two forms: one that spells it out and is more easily understood and a shorter form that is easier to type. It’s up to you to choose the one you’re more comfortable with and they can be mixed and matched.
Spaces:
spaces are not necessary. We show the commands with spaces because they’re easier to understand. They work equally well with or without spaces.
Spelling:
An effort was made to make those commands more forgiving of typing mistakes. Many Scratch users are still learning to use a keyboard and how to spell.
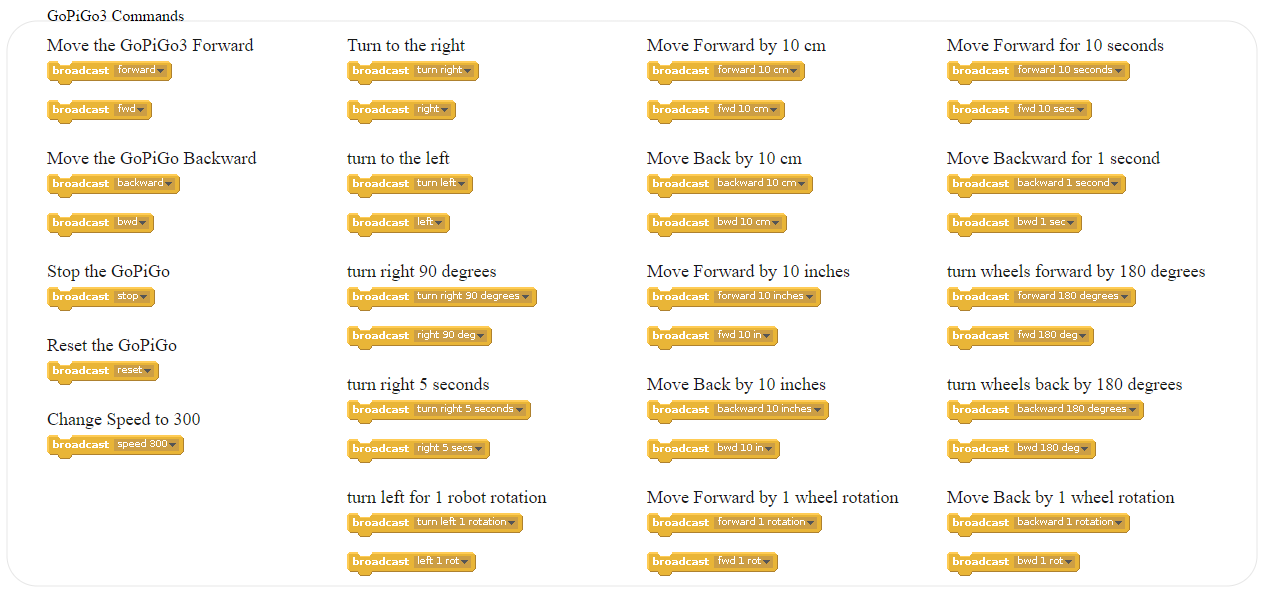
- Move forward
You can Broadcast “FORWARD” to move the GoPiGo Forward. You can provide a set distance in inches or in cm and the GoPiGo3 will stop once it’s reached. Or you can just signal to go forward in which case the GoPiGo3 will keep going until told to stop.

- Move back
You can Broadcast “BACKWARD” to move the GoPiGo back. The behavior is the same as the forward blocks
- Turn left
You can Broadcast “LEFT” to turn the GoPiGo left. You can specify a certain number of degrees and the GoPiGo3 will stop when in its new position, or a generic ‘turn left’ command that will require you to stop the GoPiGo3.
- Turn Right
You can Broadcast “RIGHT” to turn the GoPiGo Right
- Stop the GoPiGo
You can Broadcast “STOP” to stop the GoPiGo. Or “RESET” to stop everything (leds, buzzer, motors)


- Set Speed
You can Broadcast “SPEED <newspeed>” to set the speed value

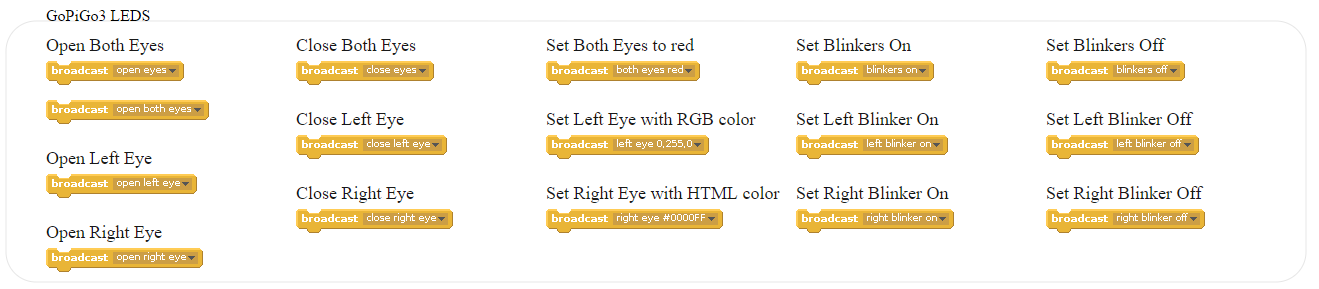
- LED
The GoPiGo3 comes with two sets of LEDs, two in front called blinkers, and two on top that are Dex’s eyes.- Blinkers:


- Eyes:


- Eye Color:
The following eye colors are known:
white, yellow, fuchsia, red, silver, grey, olive, purple, maroon, aqua, lime, teal, green, blue, navy, black
Or you can use an RGB format or Hex values:


- Blinkers:
Reference Sheet of all GoPiGo Scratch Commands
Do click on the image to get it on its own so you can print it and keep it as a reference guide when programming.
PivotPi
If a PivotPi is connected to the GoPiGo3 then all the PivotPi Scratch commands are also available
Making Custom Broadcast Messages for Scratch
If you are familiar with Python, you can code your own custom Broadcast Messages with Scratch for the GoPiGo3.
To interact with the Scratch program, there is a Python program running in the background (GoPiGo3Scratch.py). This program catches the commands from the Scratch interface and runs a command on the GoPiGo. This program is automatically launched by the Scratch icon in Raspbian for Robots.
To make a custom command, just add a condition for the new broadcast message near the end of the file where you can find the camera and speaker broadcast messages.
Example:
For the run forward block in Scratch:
![]()
Here is the Python code handling it:
if msg=="FORWARD":
    fwd()

Similarly, you can make your own block and make them work with the GoPiGo3.
Have a question or a suggestion? Go check out our support page here or post it on the forums here.