Scratch Programming
 Scratch 1.4 comes pre-installed on all versions of Raspbian and allows you to control your BrickPi3 via a graphical user interface. However the Scratch interpreter which allows communication with the robot is only supported on Raspbian for Robots.
Scratch Principles
Interaction with the sensors and motors is done via the broadcast block and the sensor block. The Broadcast block sends a command to the BrickPi3 and the Sensor Value block reads the answer from the BrickPi3. They work hand in hand.
Anatomy of the broadcast block
Some broadcast examples:
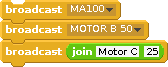 Motor Broadcast |
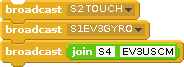 Sensor Broadcasts |
The broadcast block takes two parts:
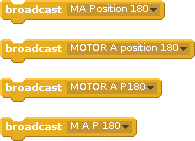
- For a motor: it needs the motor address (either the letter M or the word MOTOR followed by a letter from A to D) and the target
- For a sensor: it needs the sensor port address (S1, S2, S3 or S4) and the sensor name.
Spaces are optional between each part and are there for readability only. BrickPi3 offers a lot of flexibility in its Scratch programming so it can adapt to your style.
Controlling Motors
Motor targets are one of the following:
- to control the speed: a number from 0 to 100, with or without the % sign
- to go at full speed: one of these words: ON, FULL
- to stop: one of these words: OFF, STOP
- to go a specific rotation: Position (or the letter P) followed by a number from 0 to 360
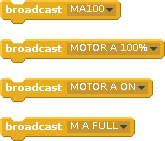 Various ways of setting motor A to full power |
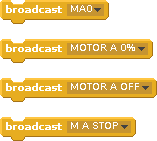 Various ways to stop motor A |
 Various ways to get half a rotation |
If you’ve programmed with BrickPi+ before, you’ll notice there is no need to enable or disable motors.
Getting Motor Feedback
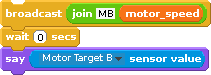
Reading the motor speed
Reading Sensors
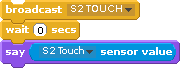
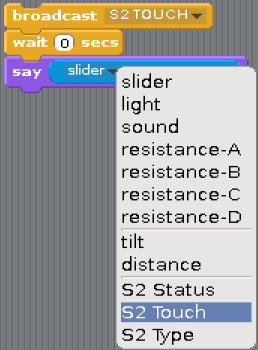
First you send a broadcast command to tell Scratch to go ahead and take a reading from the sensor. You will find the resulting reading in the sensor value block. Use the pulldown menu (the little down arrow) to select which value you are interested in as in the following image:
Take note that you must send at least one broadcast before you can find the sensor in the sensor value pulldown menu as demonstrated in the following video:
If you have experience with BrickPi+ Scratch programming, you’ll notice that setting up sensors is no longer required.
Advanced Sensor Programming
Each sensor sends two extra values to Scratch for you to read: Status and Type.
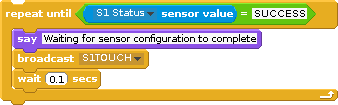
Waiting for sensor readiness
The Status one will let you know if the sensor reading was successful or if there was an error. You can use this to determine if a sensor is ready to be read.
The Status can take four values:
SUCCESS, SPI_ERROR, SENSOR_ERROR and SENSOR_TYPE_ERROR
The Type sensor value will contain the type of the sensor. [[ I can’t come up with a scenario where it would be useful???]]
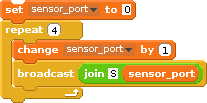
Reading multiple sensors
When you wish to get a reading from multiple sensors that have already been configured, you can do one of two things:
Use the Broadcast Update block, or use the Broadcast S1 block (also S2, S3 or S4) without the name of the sensor
|
Updating sensors and motors |
 updating sensors with a variable |
Supported Sensors
The following Sensors are supported in Scratch:
Sensor Type |
Scratch Sensor name |
Resulting Sensor Value |
Short Explanation |
| LEGO EV3 Ultrasonic Sensor | EV3US EV3USCM EV3USIN EV3USLISTEN |
US cm US cm US Inch US Listen |
default behavior (in cmd) explicit use of cm explicit use of inches Listen mode |
| LEGO EV3 Gyro Sensor | EV3GYRO EV3GYROABS EV3GYRODPS EV3GYROABSDPS |
Gyro ABS Gyro ABS Gyro DPS Gyro ABS, Gyro DPS |
same as EV3GYROABS Absolute Degrees Per Second Both at the same time |
| LEGO EV3 Color Sensor | EV3COLOR | Color | EV3 color sensor |
| LEGO EV3 Touch Sensor | EV3TOUCH TOUCH |
Touch Touch |
use TOUCH if you use either an EV3 or a NXT sensor |
| LEGO EV3 Infrared Sensor | EV3IR EV3IRPROX |
IR Prox IR Prox |
IR proximity sensor |
| LEGO NXT Ultrasonic Sensor | NXTUS ULTRASONIC |
US cm US cm |
NXT Ultrasonic |
| LEGO NXT Color Sensor | NXTCOLOR COLOR |
Color Color |
|
| LEGO NXT Light Sensor | |||
| LEGO NXT Touch Sensor | NXTTOUCH TOUCH |
Touch Touch |
use TOUCH if you use either an EV3 or a NXT sensor |
| Analog Sensor (Sound Sensor, for example) | |||
| Dexter Industries dGPS | |||
| Dexter Industries dThermal | TEMP | Temp | |
| Dexter Industries dPressure | |||
| Dexter Industries dTIR |